Getting started on iOS
Installation
Looking for an older version?
You can get an older version of the SDK in the Downloads section.
Project setup
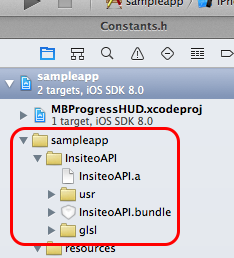
INSITEO 's modules are provided as an iOS library and an iOS bundle. To use them, you will need to link it with your application project. To do that, simply add the InsiteoAPI folder to you project.
Frameworks dependencies
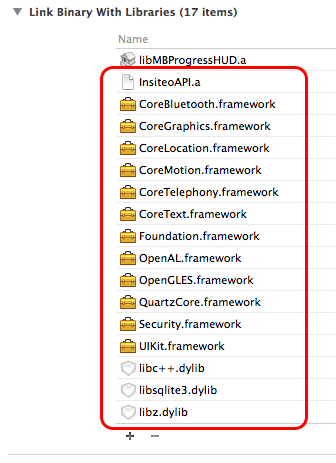
Then you will need to add all the wanted frameworks in the Link Binary With Libraries panel. Please also check the framework dependencies below and add any additional required framework. The InsiteoAPI library requires the following frameworks and libraries:
- Apple
CoreBluetooth.frameworkfor location purposes - Apple
CoreGraphics.frameworkfor rendering purposes - Apple
CoreLocation.frameworkfor location purposes - Apple
CoreMotion.frameworkfor location purposes - Apple
CoreText.frameworkfor rendering purposes - Apple
CoreTelephony.frameworkfor analytics purposes - Apple
Foundation.framework - Apple
OpenAL.frameworkfor rendering purposes - Apple
OpenGLES.frameworkfor rendering purposes - Apple
QuartzCore.frameworkfor rendering purposes - Apple
Security.framework - Apple
UIKit.framework - Apple
libc++.dylib - Apple
libz.dylib - Apple
libsqlite3.dylib
Requirements
- The INSITEO
libraryrequiresiOS 5.1or later. - The main supported architecture is
armv7but the library is fully compatible witharmv7sandarm64. - Please set
C++ Standard LibraryasCompiler Defaultin your project settings
Objective-C++
When using some classes such as ISLocationProvider or ISItineraryProvider, you will need to tag your implementor as Objective-C++ class (*.mm extension OR specific compiler settings).
Important
The Insiteo library do not use ARC.
Initialization
Start the API
Don't forget to set your API key
Before any interaction with Insiteo's API you must set your API KEY via setAPIKey. This key can be found in your INSITEO account on the back office.
The first step to access Insiteo's services, is to initialize our API via the ISInitProvider singleton. This will be done with the startAPIWithServerType and we will give you the data to pass (ie the ISEServerType, the site identifier and the language).
Use the appropriate server type
The initialization process requires a EServerType that can take the following values: ISEServerTypeDev, ISEServerTypeTest or ISEServerTypeProd. Depending on its values the downloaded data will be stored under the appropriate folder (respectively 'dev', 'test' and 'release').
You can now safely start Insiteo API by calling startAPIWithServerType,
with an id<ISPInitListener> passed as parameter.
The onInitDone method will be called on your listener when initialization is finished.
//Initialization parameters
int SITE_ID = 300;
NSString * LANGUAGE = @"fr";

//Set your API key
[ISInitProvider setAPIKey:@"MY-API-KEY"];

//And start the API
id<ISPCancelable> initTask = [[ISInitProvider instance] startAPIWithServerType:ISEServerTypeProd andSiteId:SITE_ID andLanguage:LANGUAGE andInitListener:aListener];

//The initTask object could be used to cancel the API initialization (see ISPCancelable protocol documentation).

(...)

//In your init listener:
- (void)onInitDone:(ISEInitAPIResult)result andError:(ISInsiteoError *)error {
    switch(result){
    case SUCCESS :
      //Init is ok
      break;
    case SUCCESS_NEW_DATA :
      //Init is ok and new packages are available
      break;
    case FAIL :
      //Init failed.
      //More information in error (see ISInsiteoError documentation)
      break;
    default:
      break;
    }
}
Handle the initialization process in background
The startAPIWithServerType method is asynchronous. Be sure to provide a valid id<ISPInitListener>, to be notified of init ending.
If startAPIWithServerType returns:
-
SUCCESS, you can use INSITEO APIs straight away. -
SUCCESS_NEW_DATA, it means that new data packages are available on INSITEO servers. You can then call theupdatePackagesWithInitListenermethod on theISInitProvidersingleton in order to download and install new data (update is asynchronous, thus its result will be send to the listener, through theonDataUpdateDonecallback). -
FAIL, it means that INSITEO servers could not be reached. If you want to use an INSITEO module, you have to check if your application has enough data to run. This can be done usinghasPackageWithPackageType:andServerTypeonISInitProvidersingleton.
Handle data updates
ISInitProvider as below:
//Notifications will be sent through following callbacks
id<ISPCancelable> initTask = [[ISInitProvider instance] updatePackagesWithInitListener:aListener];

//The initTask object could be used to cancel the API update (see ISPCancelable protocol documentation)

(...)

//Notifications will be sent to the listener through following callbacks:
- (void)onDownloadProgressWithProgress:(int)progress andTotal:(int)total {
    (...)
}
- (void)onInstallProgressWithProgress:(int)progress andTotal:(int)total {
    (...)
}
- (void)onDownloadPackageWillStart:(ISPackageType)packageType {
    (...)
}
- (void)onDataUpdateDone:(Boolean)success andError:(ISInsiteoError *)error {
    (...)
}
Update only what you need
You can also call the update method with a list of specific package to update but they must be at least in the list of getNewPackages.
Handle the update process in background
The updatePackagesWithInitListener method is asynchronous. Be sure to provide a valid id<ISPInitListener>, to be notified of initialization events.
When updating packages, the id<ISPInitListener> will receive notifications for packages download progress, and then for packages install progress (on UI thread). Once the update is finished, the id<ISPInitListener> will receive an onDataUpdateDone event.
When calling updatePackagesWithInitListener, an id<ISPCancelable> is returned. Call cancel on this object to cancel the current update.
Map
Packages dependencies
Be aware that you need to have installed at least the following packages:
-
A
MAP_DATA_PACKAGEpackage, which contains maps information such as zoom levels and scales. -
And a
TILES_PACKAGEpackage, which contains.3cmfiles that will be displayed.
[[ISInitProvider instance] hasPackageWithPackageType:MAP_DATA_PACKAGE andServerType:SERVER].
Adding graphical objects on map
An ISMapView is provided and can be used to display a specific 2D map with specific interactive areas. The framework also provides advanced features such as additional rendering layouts management (promotional, special areas etc…) or specific events handling.
By default, the ISMapView will display a tiled map of the site, and provide basic functions on this map (such as move, center, and pinch to zoom). But it also allows you to display custom interactive objects on this map. This will be done using custom renderers and custom render touch objects using the id<ISPRTO> protocol.
The ISMapView will first draw the tiled map, and then will loop on all its renderers, calling invalidateWithLayer on each one. Each renderer owns a list of id<ISPRTO>. In its invalidateWithLayer method, the renderer will loop on this list, and call invalidateWithLayer on each id<ISPRTO>.
The ISMapView will also detect touches, and dispatch them to all id<ISPRTO>. A listener can be set on the map controller, to be notified of clicks on specific id<ISPRTO> class (see ISMap2DView) class documentation.
MapAPI, you will need to get an ISMap2DView:
//ISMap2DView initialization
ISMap2DView * mapView = [ISMap2DView map2DViewWithFrame:self.view.frame andMapListener:self];

//Add it
[self.view addSubView:mapView];
Prerequisites
- You will need to initialize
id<ISInitProvider>before getting anISMap2DView. - You will need to provide an
id<ISPMapListener>to be notified ofISMap2DViewevents.
Create your own ISPRenderer
A renderer is a class that defines drawing behavior for a certain type of id<ISPRTO>. If you want to use your own customized renderer, you will need to create a class that implements the id<ISPRenderer> protocol. Then you will be able to specify the renderer behavior through the invalidateWithLayer method for example. You will also have to set a priority to your renderer that will define the order in which they will be drawn (Renderer with highest priority will appear on top of the map).
//How to add a custom renderer
[mapView addRenderer:aRenderer]];
Where to find my ISRTO?
All id<ISPRTO> of class corresponding to the custom renderer class, when added via ISMap2DView, will be put in custom renderer. See "Use your own ISPRTO" chapter below.
You will also need to implement an exhaustive list of functions described in the protocol. See the complete documentation for more details.
Create your own ISPRTO
id<ISPRTO> protocol. Then you will be able to specify your object’s behavior through methods like:
//The method you will need to override in order to manually manage your object rendering
- (void)invalidateWithLayer:(ISLayer *)layer andRatio:(double)ratio andOffset:(CGPoint)offset andAngle:(float)angle andPriority:(int)priority;
Use existing components
You can now also extends the ISGenericRTO.
Most of the basic features that are required for a id<ISPRTO> are implemented in this example.
//The method you will need to override in order to manually manage touch down events
- (ISETouchObjectResult)onTouchDown:(ISTouch *)touch;
ISMap2DView, using the following methods:
//Methods you will need to call in order to add an RTO on the map
- (Boolean)addRTO:(id<ISPRTO>)rto;
- (Boolean)addRTO:(id<ISPRTO>)rto inZone:(int)zoneId;
id<ISPMapListener> following callback:
//The method you will need to override handle touch events on interactive zones
- (void)onZoneClickedWithZone:(int)idZone andActionType:(int)actionType andActionParameter:(NSString *)actionParameter;
You can then add your id<ISPRTO> that will be displayed in this area.
Link with external content
With the Insiteo framework, you can link your content to our zone based system. To do that you will have to register this content through our back office. For example you can link a shop to one of our zone and then, get back this content in your application, simply by requesting our framework.
Insiteo Interactive maps - 2 minutes tutorialISDBHelperMap class like so:
//Get all Zone/POI assocations for a given external identifier
NSArray * zonesPois = [ISDBHelperMap getExternalZonePoisForExtIdPoi:externalPoiId];
Important
An array is returned, because you can link a POI to several zones and a zone can contains several POIs.
ISDBHelperMap class like so:
//Get all external Zone/POI assocations for a given zone identifier
NSArray * zonesPois = [ISDBHelperMap getZonePoisForIdZone:zoneId andExternal:YES];
Each method returns an ISZonePoi object which contains a position in meters and an offset (if specified) in order to place your on id<ISPRTO> on our map.
Zone/Poi associations offsets
-
If you want an offset to be used when drawing an
ISPRTOin aISZoneyou have to explicitly set it we adding theISPRTOto theISMapView.
id<ISPRTO> to our map like so:
//Add an RTO in the zone center
[map2DView addRTO:myRto inZone:zonePoi.zoneId];
Best pratices
//Cocos2d
- (void)applicationDidEnterBackground:(UIApplication *)application {
    [[CCDirector sharedDirector] stopAnimation];
}

- (void)applicationWillEnterForeground:(UIApplication *)application {
    [[CCDirector sharedDirector] startAnimation];
}

- (void)applicationWillResignActive:(UIApplication *)application {
    [[CCDirector sharedDirector] pause];
}

- (void)applicationDidBecomeActive:(UIApplication *)application {
    [[CCDirector sharedDirector] resume];
}

//Insiteo
- (void)viewDidAppear:(BOOL)animated {
    [super viewDidAppear:animated];
    [map2DView startRendering];
}

- (void)viewDidDisappear:(BOOL)animated {
    [super viewDidDisappear:animated];
    [map2DView stopRendering];
}
Location
Packages dependencies
If you intend to use the this service you have to make sure that the location package have been properly downloaded.
You can easily check if the package is available on the device with the following method: [[ISInitProvider instance] hasPackageWithPackageType:LOCATION_PACKAGE andServerType:SERVER].
iOS 8 compatibility
In order to be iOS 8 fully compatible, you will need to add the NSLocationWhenInUseUsageDescription key in your .plist. You can leave the corresponding value empty or specify a custom message that will be displayed the first time the SDK will ask to use the location service.
Location process
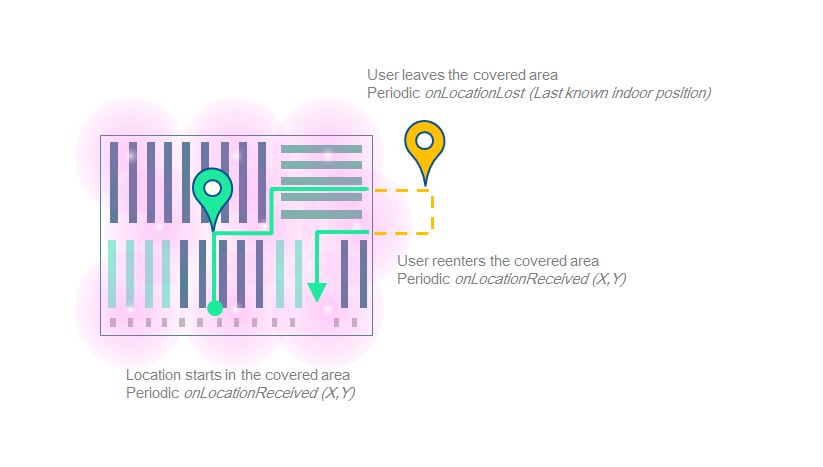
Get your first location
You can use our LocationAPI to obtain location information. The LocationAPI needs initialization information in order to communicate with our servers. You can easily link this library to the INSITEO map, so the location can be displayed on it.
LocationAPI, you will need to create an ISLocationProvider
instance (or ISGfxLocationProvider instance if you want the location to be displayed automatically on the map).
To receive location, you will need to start the ISLocationProvider, with location flags (indicating location behavior) and a id<ISPLocationListener>:
//Instanciate the location provider
ISGfxLocationProvider * locProvider = [[ISGfxLocationProvider alloc] init];

//And start it
[locProvider startLocation:(COMPASS|BLE|MEMS) andLocationListener:aListener];

//Add location renderer to the ISMap2DView, thus location is displayed on map
[map2DView addRenderer:[locProvider renderer]];
Which flags to use
Please contact us to get the appropriate location settings.
Prerequisites
- The API needs to be initialized.
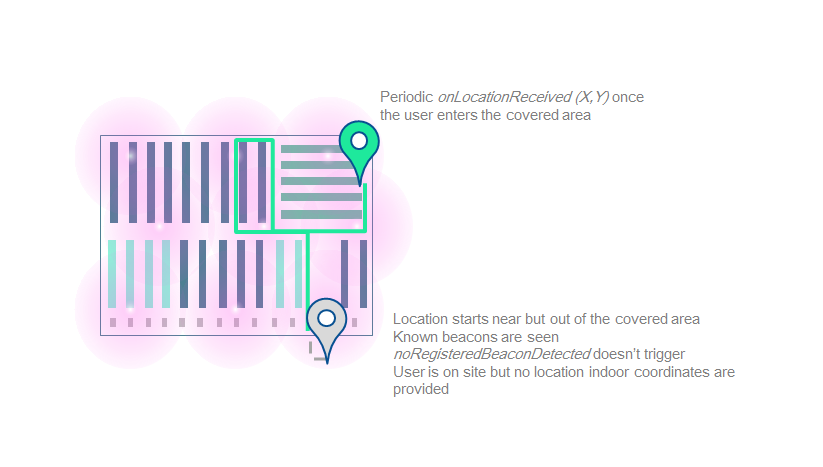
- You can now be notified when no registered beacons were detected, which probably means that the user started the location whereas he is not on site.
Available services
Available location-based services are:
-
LBS_MODULE_ITINERARY: this module computes the route between an arrival point, and a departure point (could be the user current location). -
LBS_MODULE_GEOFENCING: this module detects when user location is in "active" areas, and notify the application that the user entered/stayed in/left these areas.
Get a specific LBS module
To use them, you have to request them from ISLocationProvider with the getLbsModule method. Be aware that a new module is created for each call of getLbsModule.
Itinerary
Packages dependencies
If you intend to use the this service you have to make sure that the itinerary package have been properly downloaded.
You can easily check if the package is available on the device with the following method: [[ISInitProvider instance] hasPackageWithPackageType:ITINERARY_PACKAGE andServerType:SERVER].
Enable itinerary rendering
Itinerary or GeoFencing you have to get the module from the location provider. If you want it to be displayed on an INSITEO map, do as below:
//Get the itinerary provider
ISGfxItineraryProvider * itineraryProvider = (ISGfxItineraryProvider *)[locProvider getLbsModule:LBS_MODULE_ITINERARY];

//Get itinerary renderer linked to provider
ISItineraryRenderer * itineraryRenderer = [itineraryProvider renderer];

//Register for itinerary rendering user interaction (such as clicks).
[itineraryRenderer setRenderListener:listener];

//Add renderer so itinerary is displayed on map
[map2DView addRenderer:itineraryRenderer];
Request an itinerary between two points
//Request an itinerary between two points (A on map "1", the other on map "2")
ISItineraryRequest * request = [itineraryProvider requestItineraryWithStartPoint:CGPointMake(50, 50) andStartMapId:1 andEndPoint:CGPointMake(200, 100) andEndMapId:2 andListener:itineraryListener andPMR:NO];
Retrieve itinerary requests
An ISItineraryRequest is returned in order to identify sender through callbacks.
Request an itinerary from user location
//Request an itinerary from the user location to a point A
ISItineraryRequest * request = [itineraryProvider requestItineraryFromCurrentLocationWithEndPoint:CGPointMake(200, 100) andEndMapId:2 andListener:itineraryListener andPMR:NO];
Request an optimized route
//Request an optimized route between several waypoints (an ISItineraryOptimizedRequest is returned)
ISItineraryOptimizedRequest * optimizedRequest = [itineraryProvider requestOptimizedItineraryWithWaypoints:waypoints andOptimMode:ISEOptimizationModeNearestNeighbourShortestPath andKeepFirstPosition:YES andKeepLastPosition:NO andListener:itineraryListener andPMR:NO];
Request parameters
You can specify if you want to keep the first position, last position, or both.
Otpimization modes
There are multiple optimization modes available but we highly recommend to keep ISEOptimizationModeNearestNeighbourShortestPath as the default one.
Recomputation
//Method called when the user position changed
- (void)onItineraryChangedWithRequest:(ISItineraryBaseRequest *)request andDistanceToItinerary:(float)distanceToItinerary {
    //You can check if the distance between the user location and the computed itineray needs a recomputation
    if (distanceToItinerary > MAX_RECOMPUTATION_DISTANCE) {
        //Recompute the itinerary
        [request recompute];
    }
}
When to recompute?
We usually use 10.0 meters as MAX_RECOMPUTATION_DISTANCE.
Geofencing
Packages dependencies
If you intend to use the this service you have to make sure that the geofencing package have been properly downloaded.
You can easily check if the package is available on the device with the following method: [[ISInitProvider instance] hasPackageWithPackageType:GEOFENCING_PACKAGE andServerType:SERVER].
Start the Geofencing module
Geofencing module, simply do like so:
//Get the geofencing module from the location provider
ISGeofenceProvider * geofenceProvider = [[m_locationProvider getLbsModule:LBS_MODULE_GEOFENCING] retain];

//"Start" geofencing
[geofenceProvider setListener:listener];
Understand geonotifications
ISGeoFenceZone.
- The first one contains all zones the user just entered
- The second one contains all zones where the user still is and has spent a certain time .
- The third one contains all zones the user just left.
//Method alled when geofencing module has new data available
- (void)onGeofenceDataUpdateWithEnteredZones:(NSArray *)enteredZones andStayedZones:(NSArray *)stayedZones andLeftZones:(NSArray *)leftZones {
    //Entered zones
    for (ISGeofenceZone * geoZone in enteredZones) {
        NSLog(@"User entered zone %@", geoZone.GUID);
    }

    //Stayed zones
    for (ISGeofenceZone * geoZone in stayedZones) {
        NSLog(@"User still is in zone %@", geoZone.GUID);
    }

    //Left zones
    for (ISGeofenceZone * geoZone in leftZones) {
        NSLog(@"User has left zone %@", geoZone.GUID);
    }
}
Dynamic geofencing
In the last version of our API, geopush content can be added to the ISGeofenceProvider directly from your application in addition to the one fetched from the server. This enables, for example, your content to be more accurate to a specific user's behaviour or using context.
-
The created
ISGeofenceArea's polygon will be based on the specificISZoneparameters that have to be provided in the back office. -
If the
ISGeofenceAreaparameters (ie width, enteredTime, enteredEnabled ... ) are not set they will be fetched from the configuration file. This configuration file defines those parameters byISMapand not byISZone. -
If the creation succeeded the
ISGeofenceAreawill be automatically added to theISGeofenceProvider.
Adding content to a specific zone or for a specific zone/poi association
ISZone or ISZonePoi, you can use the methods shown below.
A polygon based on the ISZone parameters and the provided ISGeofenceArea width will be created and this ISGeofenceArea will be automatically added to the ISGeofenceProvider.
//For a ISZone

- (ISGeofenceArea *)addGeofenceAreaWithZoneId:(int)zoneId andContent:(NSString *)content;

- (ISGeofenceArea *)addGeofenceAreaWithZoneId:(int)zoneId andContent:(NSString *)content andEventTime:(float)eventTime;

- (ISGeofenceArea *)addGeofenceAreaWithZoneId:(int)zoneId andContent:(NSString *)content andEnterEnabled:(Boolean)enterEnabled andEnterTime:(float)enterTime andStayEnabled:(Boolean)stayEnabled andStayTime:(float)stayTime andLeaveEnabled:(Boolean)leaveEnabled andLeaveTime:(float)leaveTime andDefaultGeoWidth:(float)defaultGeoWidth;

//For a ISZonePoi association

- (ISGeofenceArea *)addGeofenceAreaWithZonePoi:(ISZonePoi *)zonePoi andContent:(NSString *)content;

- (ISGeofenceArea *)addGeofenceAreaWithZonePoi:(ISZonePoi *)zonePoi andContent:(NSString *)content andEventTime:(float)eventTime;

- (ISGeofenceArea *)addGeofenceAreaWithZonePoi:(ISZonePoi *)zonePoi andContent:(NSString *)content andEnterEnabled:(Boolean)enterEnabled andEnterTime:(float)enterTime andStayEnabled:(Boolean)stayEnabled andStayTime:(float)stayTime andLeaveEnabled:(Boolean)leaveEnabled andLeaveTime:(float)leaveTime andDefaultGeoWidth:(float)defaultGeoWidth;
Adding content for a given position
ISPosition, you can use the methods shown below.
A square of size the on the given in parameter (or by default 4 time the size defined in the configuration file) and center on the given position will be created.
- (ISGeofenceArea *)addGeofenceAreaWithGUID:(NSString *)guid andCenter:(ISPosition *)center andContent:(NSString *)content;

- (ISGeofenceArea *)addGeofenceAreaWithGUID:(NSString *)guid andCenter:(ISPosition *)center andContent:(NSString *)content andEventTime:(float)eventTime;

- (ISGeofenceArea *)addGeofenceAreaWithGUID:(NSString *)guid andCenter:(ISPosition *)center andContent:(NSString *)content andEnterEnabled:(Boolean)enteredEnabled andEnteredTime:(float)enteredTime andStayedEnabled:(Boolean)stayedEnabled andStayedTime:(float)stayedTime andLeaveEnabled:(Boolean)leaveEnabled andLeaveTime:(float)leaveTime;

- (ISGeofenceArea *)addGeofenceAreaWithGUID:(NSString *)guid andCenter:(ISPosition *)center andContent:(NSString *)content andSize:(float)size;

- (ISGeofenceArea *)addGeofenceAreaWithGUID:(NSString *)guid andCenter:(ISPosition *)center andContent:(NSString *)content andEventTime:(float)eventTime andSize:(float)size;

- (ISGeofenceArea *)addGeofenceAreaWithGUID:(NSString *)guid andCenter:(ISPosition *)center andContent:(NSString *)content andEnterEnabled:(Boolean)enteredEnabled andEnteredTime:(float)enteredTime andStayedEnabled:(Boolean)stayedEnabled andStayedTime:(float)stayedTime andLeaveEnabled:(Boolean)leaveEnabled andLeaveTime:(float)leaveTime andSize:(float)size;
Removing a dynamic geofence area
ISGeofenceArea from the ISGeofenceProvider call the appropriate remove method based on how it was added.
- (void)removeGeofenceAreaWithGuid:(NSString *)guid;

- (void)removeGeofenceAreaWithZoneId:(int)zoneId;

- (void)removeGeofenceAreaWithZonePoi:(ISZonePoi *)zonePoi;

- (void)removeGeofenceAreaWithArea:(ISGeofenceArea *)area;
Geofencing rendering
In this new version 3.2.0_RC2 you can now view your ISGeofenceArea on your ISMapView. Like all other LBS services, you will have to retrieve its id<ISPRenderer> and pass it to the ISMapView. All the geofencing zone will be displayed ie the one define on the back office that one created dynamically.
Analytics
Packages dependencies
If you intend to use the this service you have to make sure that the analytics package have been properly downloaded.
You can easily check if the package is available on the device with the following method: [[ISInitProvider instance] hasPackageWithPackageType:ANALYTICS_PACKAGE andServerType:SERVER].
Production vs Development
In order to be able to differentiate data from an application in a testing environment from a release one Insiteo's SDK uses the
[ISCommonConstants getDebugMode].
You should make sure to set this tag to false for your release version.
Starting the Analytics service
In order to use the analytics service you have to make sure it gets started during the API initialization. If you did not specify the analytics behavior in the API initialization method the service will be started automatically if the packages depedencies prerequisite is met. Otherwise this will depends on the value passed as the analyticsAutoStart as true will try to start it and false will keep it turned off and no data will be stored during the session.
Location events
If you have decided to use the analytics service then the user's location will be automatically sent for datamining analysis. In order to avoid internet requests overload location will be aggregated according to a given frequency that can be set in the back office.
Generic events
For any other type of events you would like to keep track of you can use the
ISAnalyticsGenericEvent. This event
enables you to add up to 2 NSString, 2 int, 2 double, 2 ISPosition
and a label to match most cases.
ISAnalyticsGenericEvent
to the ISAnalyticsManager.
ISAnalyticsGenericEvent * zoneEvent = [[ISAnalyticsGenericEvent alloc] initWithEventType:@"generic_event"];

[zoneEvent setSParam1:@"product a"];
[zoneEvent setPositions:[NSArray arrayWithObject:aLocation.position]];

[[ISAnalyticsManager instance] addGenericEvent:zoneEvent];
Insiteo's API already trace some basic events among them:
- Location start and stop
- Geofence entered, stayed and left
-
Map changes, zone clicks and
id<ISPRTO>added withISZonePoi - Itinerary requests
Tracking products displayed on map
If you want to trace when a product is added to the map you can use
addRTO:inZonePoi:.
This will generate a ISAnalyticsGenericEvent
with the String1 set with the external id of the Poi defined in the
ISZonePoi.
Completing a generic event
In can be useful in some cases to add information to a
ISAnalyticsGenericEvent for that you must set a
ISPAnalyticsListener that will be notified everytime a new generic
event is added. Returning false in this method will dismiss the event.